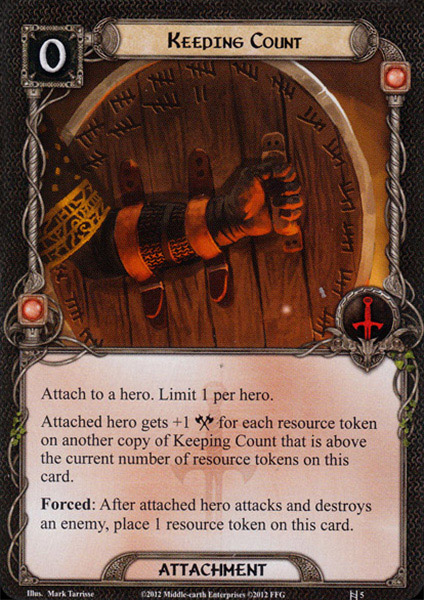
If you like to do some bookkeeping this card can actually work to great effect in high player counts for one specific kind of deck.
The deck:
The deck in which Keeping Count works involves Aragorn, Merry and (in most cases) Pippin. This deck usually attaches 3 Fast Hitches and 2 Rohan Warhorses to Merry. This would allow Merry to attack 5x when setup and Aragorn 6x. Having at least multiple attacking actions with Aragorn is necessary to quickly setup Keeping Count.
Setting up the first copy in round 1:
The first copy should go on Aragorn. Since Aragorn can possibly kill 3+ enemies from the first round on. The second copy goes onto Merry the following round. Assuming you're able to get all the readying on Merry, Aragorn will stack 3 resources on his copy of Keeping Count and Merry's copy of Keeping Count will grant at least +3 .
Setting up the second copy in round 2+:
From then on Merry attack will increase by one every round, because Aragorn will have 1 extra attacking action compared to Merry. So if you kill 3 extra enemies, the counts will be 2 on Merry's Keeping Count and 6 on Aragorn's copy, which results in +4 . Kill 3 more the next round and the counts continue to 4 for Merry and 9 for Aragorn. So Merry gets +5 .
In case you leave multiple rounds between playing the first copy and the second one, it's not unlikely Aragorn's Keeping Count is already at 10 resources.
In case you also find the third copy of Keeping Count, an attack boost of 20+ isn't out of the realm of possibilities.
Can you get this setup reliably?
To get the maximal effect of Keeping Count you need quite a number of cards: 3x Fast Hitch, 2x Rohan Warhorse and 2x Keeping Count. This might sound like a lot but isn't as hard as you might think. Pippin is drawing you a card for basically every engagement. So Pippin assisted by Take No Notice, Daeron's Runes, Drinking Song and possibly Deep Knowledge and Foe-hammer gives you very good chances of finding at least 2 copies of Keeping Count and at least 2 copies of the readying attachment for Merry which is sufficient.
Conclusion:
That all said. The card is not good outside of this deck. The card might work efficiently if you can quickly pull off Hour of Wrath or set-up Elladan properly but both are not easy nor likely. So in most cases it is like they said before: "A pretty bad card with a high fun/meme level"
An example:
One deck where the card is ran efficiently: [DB11] Aragorn, Again a Machine